Tut uns leid, dieser Hilfe-Artikel ist zurzeit nicht in Deutsch verfügbar. Wenn Sie möchten, können Sie eine Übersetzung von Google versuchen.
Dieser Hilfeartikel bezieht sich auf eine alte Version von Direct Mail.
Polls are an easy way to solicit feedback from your subscribers. In the message editor, you use the Poll block to insert a question and set of multiple-choice responses into your email. When you subscribers receive the email, they can click on one of the responses to cast their vote. You can view poll results as they update live in your campaign report.
Your message can contain more than one poll.
How to add a poll to your message
- Click on the Insert Content popup menu in the message editor toolbar
- Click on Poll
- Click where in your message you want the poll to appear
Configuring your poll
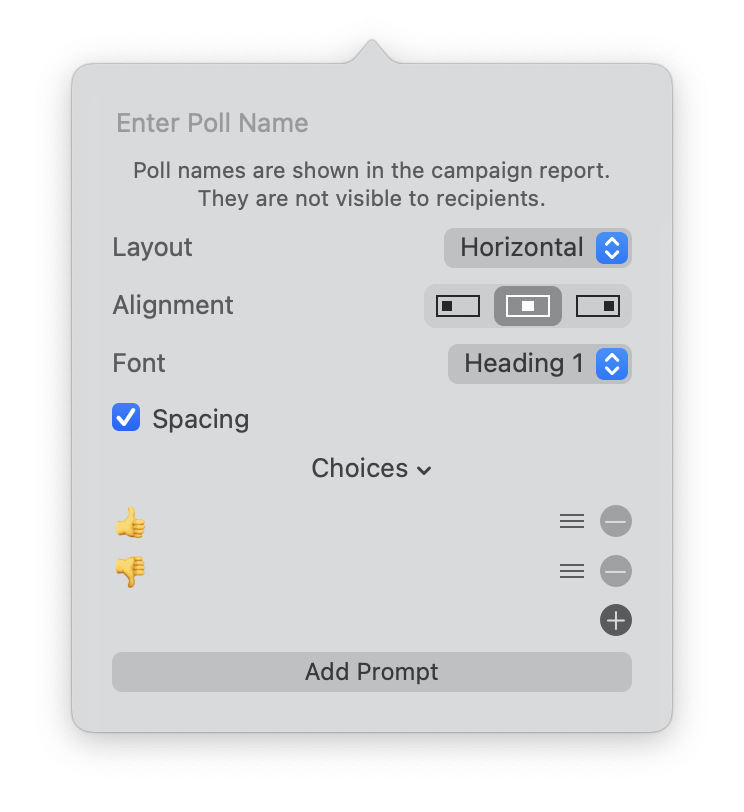
You can configure your poll by clicking on it in the message editor. The following options can be configured:

Poll Name
This is optional, but recommended to fill in. None of your recipients will see the name of your poll, but it does appear in your campaign report. If your message contains more than one poll, giving each one a unique name will make it easier to understand poll results in your campaign report.
Layout and Alignment
This option configures how the poll choices will be laid out:
- Vertically or Horizontally
- Aligned Left, Middle, or Right
Font
You can choose one of the built-in text styles (e.g. Heading 1, Heading 2, Heading 3, Paragraph, etc.) so that your poll choices look visually consistent with the rest of your message, or you can choose a custom font, size, and color if you want them to stand out in some way.
Spacing
Like other blocks (image blocks, video blocks, etc.) you can configure your poll to have extra spacing around it or not. Choose the option that looks best to you.
Choices
This is the most important option to configure in your poll. This is where you define the list of choices that your respondents (i.e. the recipients of your email) can choose from. The “Choices” pop-up menu gives you a list of predefined choices for common types of polls. You can also define your own custom choices.
If you define your own custom choices, it’s recommended to keep the labels short. You can use text or emoji, but not images. To reveal the emoji picker, choose "Edit > Emoji & Symbols" from the menu bar, or use the emoji key on your keyboard if available.
To delete a choice, click the “-“ button to the right of the label. A poll must have at least two choices.
To move or re-order a choice, click the “handle” to the right of the label and drag it up or down.
To add a new choice, click the “+” button at the bottom.
Choices: Configuring a Rating Scale

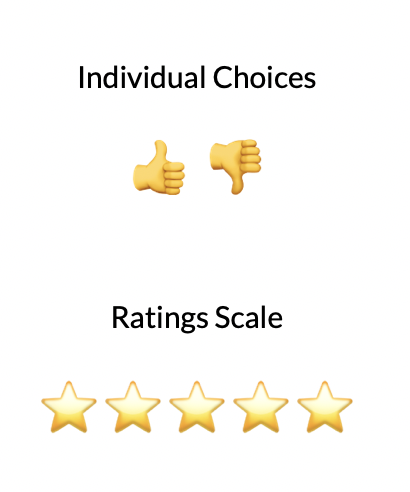
If desired, you can configure your poll to display as a rating scale instead of a list of choices. For an example of the difference between the two, click on the “Choices” pop-up menu and choose one of the “Stars” options (like “3 Stars”), then compare those to any of the other choices. You will see that instead of displaying a list of individual choices to click on, Direct Mail instead “collapses” those choices into a rating scale. The recipient can click as far up or down on the rating scale as they like to indicate their response.
You can use the built in “Stars” rating scale, or make your own. Use emoji typically works best. To display as a rating scale, your poll must meet the following criteria:
- Layout should be Horizontal
- Must have three or more choices
- The first choice must be a single character or emoji
- Each successive choice must be that same character/emoji, but repeated
You can use the “3 Star” or “5 Star” predefined choices as an example.
Add Prompt
This button is provided as a convenient way to add a text block above your poll where you can type in a question or prompt.
Viewing poll results
When your subscribers receive your email and click on a poll choice, their response is recorded by our servers. The subscriber will see a web page that thanks them and lets them know their response has been recorded.
You can view poll results in the “Summary” section of your campaign report. Each poll will report:
- Number of respondents
- Most popular response
- Average response (this is only shown for polls that were configured as rating scales)
- Number of votes for each response (click the Show More links to reveal this information)
When a subscriber responds to your poll by clicking on a choice, that “click” is also recorded in your campaign report, just like any other click would be. Because of this, you can also view stats related to your poll in the “Links” and “Recipients” sections of your campaign report. Clicks on polls will also show up in a subscriber’s activity report.
If a subscriber responds more than once to your poll, or clicks on more than one choice, only the most recent response is used when calculating the results in the “Summary” section. The “Links” and “Recipients” section of your campaign report will still show all click events.